
Drum Microphone Placement: The Complete Studio Guide
Drum Microphone Placement: What Nobody Tells You
Thirty-five years of recording drums in professional studios gives you perspective. I've seen brilliant engineers ruin a perfect take because of a poorly placed microphone, and I've seen seemingly impossible sessions saved by a smart miking decision. If there's one thing that separates an amateur recording from a professional one — beyond the gear or the instrument — it's microphone placement.
Today I want to share everything I know about this subject. Not textbook theory, but real-world judgment forged in hundreds of sessions with artists like Alejandro Sanz, Juanes, Antonio Orozco, and Sergio Dalma. Let's get into it.
Why Placement Is Everything
Before we talk about centimeters and angles, I need you to understand a fundamental principle: the microphone doesn't hear what you hear. Your ears are omnidirectional, contextual, and adaptive. A microphone is a mechanical device with a fixed polar pattern, a specific frequency response, and a sensitivity to sound pressure that can work for you or against you.
When I place a microphone on the kick drum, I'm not just thinking about capturing the hit. I'm thinking about:
• Phase relationship with the snare microphone
• How much room sound I want to include
• Whether I need more attack or more body
• What will happen when that channel hits the Neve 1073 or API 512c preamp
Every decision is linked to the next one. That's what makes microphone placement an art, not an exact science.
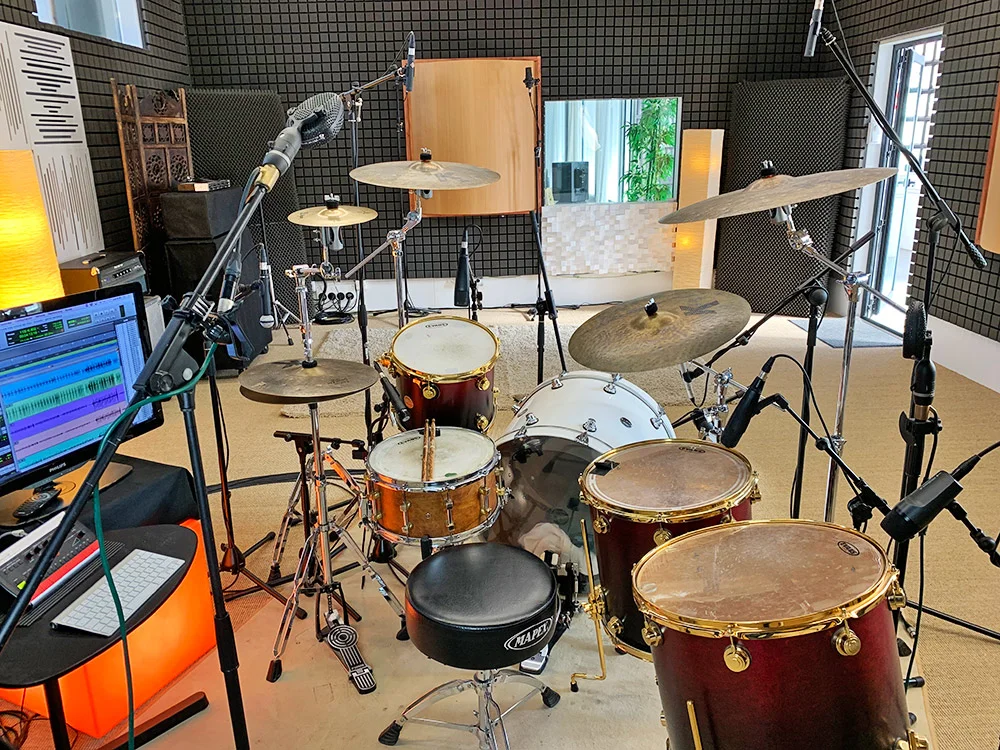
The Kick Drum: Where It All Begins
The kick drum is, in many productions, the most critical element. It's the rhythmic foundation on which everything else rests. A poorly recorded kick can make the entire mix sound weak, no matter what you do with plug-ins afterward.
Inside the kick drum
In most of my sessions I use a large-diaphragm dynamic microphone inside the kick. The AKG D112 and Shure Beta 52A are the standard workhorses, though in more demanding sessions I've used the Sennheiser MD 421 to get a more present midrange.
The position inside the kick dramatically changes the sound:
• Close to the batter head (5-8 cm): Lots of click, lots of transient, little body. Ideal for genres that need extreme definition, like metal or heavily processed pop.
• Midway through the drum: A balance between attack and body. My starting point in 80% of sessions.
• Close to the resonant head: More body, less attack. For organic genres like jazz, bossa nova, or flamenco fusion.
Angle matters too. Pointing the microphone directly at the beater impact point gives maximum attack. Rotating it slightly away from that point reduces the highs and softens the transient.
Outside the kick drum
If the resonant head has a hole (which is common in recording situations), I can add a second microphone outside, about 30-60 cm from the head. This captures more body and room, and combined with the inside mic, gives me a kick with real dimension.
The key here is always to check phase. If the two microphones are out of phase, instead of adding together, they subtract. Use the phase flip button on your preamp or in your DAW and choose the position that sounds fuller.
The Snare: The Heart of the Groove
The snare drum is probably the most studied, most processed, and most debated element in the history of music production. And for good reason: it defines the sonic character of a song more than any other rhythmic element.
Top microphone
A cardioid dynamic microphone placed over the top head of the snare, pointing toward the center but slightly toward the rim, about 5-10 cm above, is the universal starting point. The Shure SM57 is the most used microphone in history for this purpose, and justifiably so: it's sturdy, consistent, and works well with virtually any preamp.
However, in higher-budget productions, I combine the SM57 with small-diaphragm condenser microphones like the Neumann KM184 or AKG C451. The condenser captures transients with greater precision and adds air and presence that the dynamic can't reproduce.
Pro tip: Tilt the microphone slightly away from the center of the snare. This reduces the most extreme pressure peaks and gives a more controlled, musical sound.
Bottom microphone (underside snare)
The microphone beneath the snare is the one that captures the snare wire timbre. Without it, the snare sounds dead, lifeless. With it, you get that brilliant crack and metallic vibration that defines the sound.
Here I also typically use an SM57 or a small-diaphragm condenser, placed about 3-5 cm from the bottom head, pointing slightly toward the center.
Phase warning: The bottom microphone will always be out of phase with the top because it's on the other side of the membrane. Flip the phase of the bottom channel in your DAW and check which version has more body and presence.
The Toms: Texture and Dynamics
Toms are the most overlooked elements in many budget sessions, and that's a mistake. When a drummer plays a fill, the toms are what tell that story. If they sound bad, the fill falls flat.
For high-shell rack toms, I position the microphone at the rim of the top head, about 3-5 cm away, pointing toward the center. The ideal angle is approximately 45 degrees relative to the head.
For the floor tom, I lower the microphone slightly and bring it closer to the head, since these toms generate more air pressure and I need to manage the proximity effect.
Microphones I regularly use for toms:
• Sennheiser MD 421: My favorite for rock and pop toms. Body, definition, and durability.
• Audix D2/D4: Excellent for tight miking situations thanks to their compact size.
• Shure SM57: Always works if I don't have another option.
Overheads: The Stereo Image
Overhead microphones define the stereo image of the drum kit. They capture the cymbals, yes, but they also capture the kit as a complete instrument, with its room and space.
There are three main techniques I use depending on the type of production:
AB Technique (Spaced Pair)
Two omnidirectional or cardioid microphones separated from each other, usually between 60 cm and 1 meter, placed at equal distance from the kick drum to maintain phase coherence. This technique gives lots of space and ambience, ideal for jazz, blues, and organic genres.
XY Technique
Two cardioid microphones crossed at 90 degrees, with the capsules nearly touching. This technique is completely phase-coherent and gives a more centered, controlled stereo image. I use it a lot in pop and when I know the mix will have a lot of information in the center.
ORTF Technique
Two cardioid microphones separated by 17 cm and angled at 110 degrees. This is the French broadcasting standard and gives a very natural, convincing stereo image. It's my favorite technique for drum recording when I want it to sound big but controlled.
Overhead microphones: In my Europe studio I primarily use Neumann KM184s as a stereo pair, or AKG C414s when I want a more open, airy sound.
Room Mics: The Soul of the Recording
If I had to choose the most underestimated element in drum recording, it would be the room microphones. They're what bring the recording to life, what make it sound like a real instrument in a real space.
After years of experimentation, my favorite configuration is:
1. A stereo pair at medium distance (2-3 meters): Captures the room ambience without too much reverb tail.
2. A mono room microphone in an elevated position: Sometimes a ribbon mic like the Royer R-121 placed 3-4 meters away and at some height gives a beautiful mono image that works perfectly in the center of the mix.
The recording room in my Europe studio has dimensions and acoustic treatment that I've been refining for years. It's not large, but it's honest. When the room mics are positioned well, the drums breathe.
Phase Issues: The Invisible Enemy
I can't close this article without talking about phase. It's the most common problem in multi-microphone drum recordings and the one that does the most damage silently.
When two microphones capture the same sound source from different positions, the signal arrives at the same point at slightly different times. If that time difference equals half a wavelength, they cancel each other out. The result is a loss of midrange frequencies, a thin, bodyless sound.
Practical rule I always apply: The distance between two microphones capturing the same source should be at least 3 times greater than the distance from each of them to that source. This is known as the 3-to-1 rule.
I also always check phase manually: I sum and subtract the channels, listen to which sounds fuller, and that's the correct configuration.
My Complete Setup in a Real Session
For a concrete reference, here's the setup I use in a standard pop/rock session at my studio:
Element — Microphone — Preamp
Kick inside — AKG D112 or Beta 52A — API 512c
Kick outside — AKG C414 — Neve 1073
Snare top — Shure SM57 — Neve 1073
Snare bottom — Shure SM57 — API 512c
Hi-hat — AKG C451 — DAD AX32
Tom 1 — Sennheiser MD 421 — DAD AX32
Tom 2 — Sennheiser MD 421 — DAD AX32
Floor Tom — Sennheiser MD 421 — DAD AX32
Overhead L — Neumann KM184 — Neve 1073
Overhead R — Neumann KM184 — Neve 1073
Room — Royer R-121 — API 512c
Every session is different, of course. Sometimes I simplify, sometimes I add more. But this is my starting point.
The Hi-Hat: Subtlety Matters
I almost forgot the hi-hat, and that would be a mistake. The hi-hat defines the feel and groove of a performance more than people realize. It's the element that gives the music its forward motion.
For the hi-hat, I use a small-diaphragm condenser — usually the AKG C451 or the Neumann KM184 — positioned about 10-15 cm above the hi-hat, angled slightly away from the bell to avoid the harsh high-frequency content that comes from that area.
The challenge with the hi-hat microphone is bleed. The snare drum is right next to it, and that bleed can be a problem or a feature, depending on how you look at it. I try to position the hi-hat mic so that the snare rejection is maximized by using the null point of the cardioid pattern. But I've learned not to fight bleed obsessively — some of the greatest drum sounds in history are full of it.
Conclusion: Listening Is the Ultimate Tool
I've described techniques, positions, angles, and distances. But ultimately, the most important tool you have is your ears. All these rules are starting points, not dogmas.
What I do at the beginning of every session, before recording a single note, is listen. I sit at the kit, play a few bars, stand up, walk around the room, kneel next to the kick drum, crouch near the snare. I listen to where each element sounds best. Then I put the microphones where my ears have told me to put them.
After 35 years of doing this, I'm still learning. Every drum kit is different. Every room is different. Every artist has their own sound. My job is to capture it.
If you have a musical project and you want your drums to sound real, I'm here. We can record in my Europe studio or I can work remotely. The result will always be the same: drums that live, that breathe, and that serve the song.